Jobeet Day 9: Console Commands
The Symfony provides lots of commands through the bin/console script (e.g. the well-known bin/console cache:clear command).
These commands are created with the Console component. You can also use it to create your own commands.
Creating a Command
Commands are defined in classes extending Symfony\Component\Console\Command\Command and usually placed in src/Command folder.
For example, you may want a command to create a category:
namespace App\Command;

use Symfony\Component\Console\Command\Command;
use Symfony\Component\Console\Input\InputInterface;
use Symfony\Component\Console\Output\OutputInterface;

class CreateCategoryCommand extends Command
{
    protected function configure()
    {
        // ...
    }

    /**
     * @param InputInterface $input
     * @param OutputInterface $output
     */
    protected function execute(InputInterface $input, OutputInterface $output)
    {
        // ...
    }
}
Configuring the Command
First of all, you must configure the name of the command in the configure() method.
Then you can optionally define a help message and the input options and arguments:
// ...
    protected function configure()
    {
        $this
            // the name of the command (the part after "bin/console")
            ->setName('app:create-category')

            // the short description shown while running "php bin/console list"
            ->setDescription('Creates a new category.')

            // the full command description shown when running the command with
            // the "--help" option
            ->setHelp('This command allows you to add new category in db...');
    }
// ....
Registering the Command
We are using symfony 4 and it automatically registers console commands by parent class.
Be sure that autoconfiguration is activated in config/services.yaml:
services:
    _defaults:
        autoconfigure: true
In lower versions console commands were registered by adding twig.extension tag.
Read more about it here.
Executing the Command
After configuring and registering the command, you can execute it in the terminal:
php bin/console app:create-category
As you might expect, this command will do nothing as you didn’t write any logic yet.
Add your own logic inside the execute() method, which has access to the input stream (e.g. options and arguments) and the output stream (to write messages to the console):
// ...

    /**
     * @param InputInterface $input
     * @param OutputInterface $output
     */
    protected function execute(InputInterface $input, OutputInterface $output)
    {
        // outputs multiple lines to the console (adding "\n" at the end of each line)
        $output->writeln([
            'Category Creator',
            '============',
            '',
        ]);

        // outputs a message followed by a "\n"
        $output->writeln('Whoa!');

        // outputs a message without adding a "\n" at the end of the line
        $output->write('You are about to ');
        $output->write('create a category.');
    }

// ...
Now, try executing the command:
$ bin/console app:create-category
Category Creator
============

Whoa!
You are about to create a category.
Console Input
Use input options or arguments to pass information to the command:
// ...
use Symfony\Component\Console\Input\InputArgument;

class CreateCategoryCommand extends Command
{
    protected function configure()
    {
        $this
            // ...

            // configure an argument
            ->addArgument('name', InputArgument::REQUIRED, 'The name of the category.');
    }

    /**
     * @param InputInterface $input
     * @param OutputInterface $output
     */
    protected function execute(InputInterface $input, OutputInterface $output)
    {
        // outputs multiple lines to the console (adding "\n" at the end of each line)
        $output->writeln([
            'Category Creator',
            '============',
            '',
        ]);

        // retrieve the argument value using getArgument()
        $output->writeln(sprintf('Name: %s', $input->getArgument('name')));
    }
}
Now, you can pass the name to the command:
$ bin/console app:create-category Tester
Category Creator
============

Name: Tester
Getting Services from the Service Container
First of all we need a service, that will create categories. Create CategoryService in already existing folder Service:
namespace App\Service;

use App\Entity\Category;
use Doctrine\ORM\EntityManagerInterface;

class CategoryService
{
    /** @var EntityManagerInterface */
    private $em;

    /**
     * @param EntityManagerInterface $em
     */
    public function __construct(EntityManagerInterface $em)
    {
        $this->em = $em;
    }

    /**
     * @param string $name
     *
     * @return Category
     */
    public function create(string $name) : Category
    {
        $category = new Category();
        $category->setName($name);

        $this->em->persist($category);
        $this->em->flush();

        return $category;
    }
}
This service has one method create that receives category name and create new category in DB.
Now to create a new category, the command has to access this services. Since your command is already registered as a service, you can use normal dependency injection:
// ...
use App\Service\CategoryService;

class CreateCategoryCommand extends Command
{
    /** @var CategoryService */
    private $categoryService;

    /**
     * @param CategoryService $categoryService
     */
    public function __construct(CategoryService $categoryService)
    {
        $this->categoryService = $categoryService;

        parent::__construct();
    }

    // ...

    /**
     * @param InputInterface $input
     * @param OutputInterface $output
     */
    protected function execute(InputInterface $input, OutputInterface $output)
    {
        // ...

        $this->categoryService->create($input->getArgument('name'));

        $output->writeln('Category successfully created!');
    }
}
Interacting with user
Sometimes user can forget to fill the name and we want somehow to interact with user and additionally to ask them the name of new category.
It is possible due to interact() method. Let’s create it:
// ...
use Symfony\Component\Console\Question\Question;

class CreateCategoryCommand extends Command
{
    // ...

    /**
     * @param InputInterface $input
     * @param OutputInterface $output
     */
    protected function interact(InputInterface $input, OutputInterface $output)
    {
        if (!$input->getArgument('name')) {
            $question = new Question('Please choose a name: ');
            $question->setValidator(function ($name) {
                if (empty($name)) {
                    throw new \Exception('Name can not be empty');
                }

                return $name;
            });

            $answer = $this->getHelper('question')->ask($input, $output, $question);
            $input->setArgument('name', $answer);
        }
    }

    // ...
}
Now the user will have second chance to enter the name of new category. This command became more user-friendly.
Command Lifecycle
Commands have three lifecycle methods that are invoked when running the command:
-
initialize() (optional)
This method is executed before theinteract()and theexecute()methods. Its main purpose is to initialize variables used in the rest of the command methods. -
interact() (optional)
This method is executed afterinitialize()and beforeexecute(). Its purpose is to check if some of the options/arguments are missing and interactively ask the user for those values. This is the last place where you can ask for missing options/arguments. After this command, missing options/arguments will result in an error. -
execute() (required)
This method is executed afterinteract()andinitialize(). It contains the logic you want the command to execute.
Color the console output
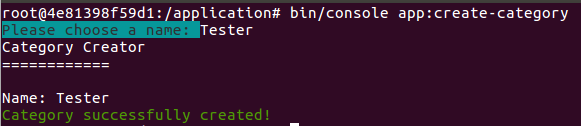
In created console command we have different types of messages: simple message, question and success message. But all them are displayed in the same way. Symfony Console component provides possibility to use colors. First let’s color in green the message that category is crated:
- $output->writeln('Category successfully created!');
+ $output->writeln('<fg=green>Category successfully created!</>');
Available colors are: black, red, green, yellow, blue, magenta, cyan and white.
Also it’s possible to setup background color by using bg=red and options like bold text: options=bold.
For example red bold text on a yellow background will be setup in next way:
<fg=red;bg=yellow;options=bold>foo</>
Symfony has some predefined tags: <info>, <comment>, <question> and <error>.
Wrap our question in proper style:
- $question = new Question('Please choose a name: ');
+ $question = new Question('<question>Please choose a name: </question>');
Finally we should view next output:
That’s all for today, you can find the code here: https://github.com/gregurco/jobeet/tree/day9
See you tomorrow!
Additional information
Next Steps
Continue this tutorial here: Jobeet Day 10: The Admin
Previous post is available here: Jobeet Day 8: The Forms
Main page is available here: Symfony 4.1 Jobeet Tutorial